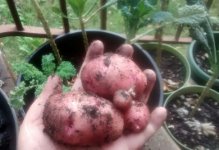
The second planting of red potatoes (from one tiny sprouting specimen in July) yielded a handful of yumminess. I can’t wait to boil these and have them with a little butter! A 3-gallon planter was plenty for the late planting, the roots and spuds were mainly in the top third. Next year, I’m going to do more and separate the seed potatoes into chunks to see if I get a higher yield with more containers!
Month: October 2015
winter garden: kale
One of the best things about our sun room is that it’s right off the kitchen. It gets plenty of sun and is about 60% windows. The bad thing is that it was an addition and has no heating vents. That said, I think the kale will do well out there.
I started off this spring with 18 kale plants, a combination of curly Winterbor kale and the reptilian Tuscan kale. Surprisingly, I still have 12 plants which are doing really well, despite bolting and being cut back this summer. (at the top of the photo are two Jerusalem artichokes… more about those later!)

My research told me that kale keeps very shallow roots, so the plan is to pot them all up and have fresh kale leaves for soups and salads as long as I can.

The plants never did very well in the backyard. There were simply too many pests. Most of the leaves were completely riddled with holes, so it was difficult to get any significant yields. Wouldn’t it be funny if the kale flourished in the winter once everything else died back!

fig propagation
The more the merrier–especially when it comes to figs. I’m currently air-layering two branches of Figgy: one to give to my sister and one to plant in the backyard. In a nutshell, you prepare a growing branch with a small vessel and a bit of soil, tricking it into growing roots. Once the roots are visible, you snip the branch below the container and plant it–voila!
I used 2-liter bottles for my vessels, cut in half then split down one side. Cut the hard spout part off; you need to be able to stretch the container open and close it around the branch you choose. Strip off the leaves where you want the roots to grow and gently score the stem to peel off about 1 inch of the bark.
Secure the container with some tape (regular Scotch tape is fine) and use a few strips to narrow the opening at the bottom so you don’t lose any soil. Fill it with a mixture of potting soil and compost, water, and wait!
They say that roots should grow in 4-8 weeks, depending on the weather and how consistently you keep the moisture level. Make sure you water your project weekly if you’re not getting rain!
saving seeds
I’m a very thrifty person, so saving seeds comes pretty naturally to me. Keep the best and ripest of each of your crops to plant next year and you can easily set yourself up for your own tried-and-true garden of greatest hits. This year, the cherry tomatoes did really well for me. The beautiful Sun Gold cherry tomatoes were exceptional. I’m still getting them, 3 months later, all from a single plant which I purchased at a hardware store. The other variety is Super Sweet 100, a bit on the small side, with a touch of acidity.
To save tomato seeds, you just let them get really good and ripe then cut them in half. Gently pry out the little seeds with the tip of a knife onto a paper towel. Each seed is encased in a little gel sac which inhibits growth, so you need to sort of smush and slide each one across the paper towel to separate it and then transfer the seed onto another paper towel to dry.
Some people will tell you that you must ferment the seeds in water to separate them and dissolve the gel. I think this method is much easier. Store the seeds in envelopes or bags, folded in a bit of paper towel.


